Getting Started
Quick start
Experienced Python users — install the fathomdata library in your development environment using pip.
pip install fathomdata
Confirm the installation worked by importing fathomdata within your code.
import fathomdata as fd
Beginner’s guide
If you’re new to Python or the Jupyter development environment — this section is for you.
Already know your way around a Jupyter notebook? Skip ahead to domain-specific content explaining how to digitize a batch record.
Once you finish these steps, you will have a Jupyter server running locally where you can execute Python code within a notebook. A Jupyter notebook is an interactive Python development environment useful for many data science and data analytics projects.
Note
Prefer to skip a local installation for now? Follow along to the tutorials in the cloud by using the Colab links.
Ensure Python is installed
Python 3 should be preinstalled. To check, open up a terminal and run the following command:
python3 --version
If that command doesn’t work, then follow these instructions to install Python 3.
You can check to see if you have Python 3 installed by checking the version:
python3 --version
If Python 3 is not installed, follow these instructions to install it.
You can check to see if you have Python 3 installed by opening up PowerShell and running the following command:
python3 --version
If that command doesn’t work, then install Python 3 from the Microsoft Store. Additional instructions are available here if necessary.
Note that all Windows commands in this documentation should be run using PowerShell – not cmd.exe.
Create a virtual environment
Code can become complicated quickly. It’s a best practice to have separate Python environments for different projects. Virtual environments help us accomplish this goal.
First, make a directory to store your code:
mkdir ~/fathom-code
cd ~/fathom-code
Next, create a new virtual environment:
python3 -m venv fathom-env
Lastly, activate the new virtual environment:
source fathom-env/bin/activate
source fathom-env/bin/activate
Allow PowerShell to execute scripts so that you can run the activation script. Answer “Y” when asked if you want to change the policy. Don’t worry – by including the -Scope Process parameter, you’re restricting this policy change to the current PowerShell session and it won’t apply elsewhere.
Set-ExecutionPolicy Unrestricted -Scope Process
Then activate the virtual environment:
.\fathom-env\Scripts\Activate.ps1
If you have any hiccups during this step, check out these virtual environment-specific instructions and tips.
Note
When you’re within a virtual environment, the name of the environment will show up at the beginning of the command prompt in parentheses.
Install Python libraries
pip is the recommended tool for installing and managing Python packages – including fathomdata and notebook (a.k.a. Jupyter Notebook). First, make sure the new virtual environment has the most up-to-date version of pip:
pip install --upgrade pip
And now, install the minimum set of packages you need to get started.
pip install fathomdata notebook
This could take minute or two – the terminal prompt will return when the install command finishes.
Start a Jupyter server
jupyter notebook
jupyter notebook
jupyter notebook --NotebookApp.use_redirect_file=False
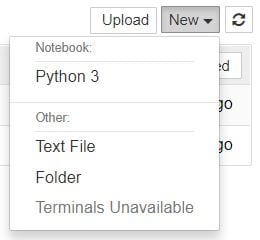
The Notebook interface will appear in a new browser window or tab at a URL that looks like https://localhost:8888/tree. To create a new notebook, use the dropdown.

The file that is created as the .ipynb extension. You can open and look at these files, but you should never need to edit them manually.
You can also open a specific Jupyter notebook.
jupyter notebook digitize.ipynb
When you are done, you can stop a Jupyter server by hitting the button that says quit, or pressing ctrl-c in the terminal window where you first started the server.
Run code in a notebook
Jupyter Notebook organizes code into cells.

While a cell is highlighted press Shift-Enter to run the code. Or, click on the Run button at the top of the page.
To keep with tradition, we always start by saying hello. Try to run the following code.
print("Hello, World!")
While the code is running, an asterisk (*) appears next to the cell. When the code is completed, the asterisk is replaced with a line number. The output of the code is beneath the cell.

A Few Other Experiments to Try
Do some math. Remember to hit Shift-Enter to execute the code!
import math
1 + math.sqrt(2)
2.414213562373095
Say hello to people, places or things.
Functions start with def and a line that starts with a pound sign (#) is a comment.
def hello(name):
   print(f"Hello, {name}!")
hello("Dion")

#hello("World")
Hello, Dion!
See files on your computer. This is important for being able to load other files or data into your code.
import os
os.listdir("..")
Fix an error. Mistakes happen, so it’s a good idea to know what Jupyter does when things go wrong. The following code has a bug. Add the missing double quotes to fix it.
my_name = "Dion"
print(f"Hello, {my_name}!)
  File "/var/folders/0g/mv93455n6ng48klt8rskh1k40000gn/T/ipykernel_9033/4217945357.py", line 2
    print(f"Hello, {my_name}!)
                              ^
SyntaxError: EOL while scanning string literal
Final check
If the following code runs without error, set up and installation is done.
If not, go back and make sure you have fathomdata installed.
import fathomdata as fd
You are ready to digitize a batch record!
Deactivating
Whenever you’re finished with the tutorials, you can deactivate your virtual environment by either closing the terminal or running the deactivate command:
deactivate